Maintaining your outdoor air conditioning (AC) unit is crucial for ensuring its efficiency and longevity. An outdoor unit that operates efficiently not only cools your home effectively but also reduces energy consumption, saving you money in the long run. Regular cleaning can prevent costly repairs and keep your home cool during those unbearable summer months. This guide will walk you through the steps needed to clean your outdoor AC unit safely and effectively, ensuring that you get the most out of your investment, and potentially reducing your energy bill.
Why Clean Your Outdoor AC Unit?
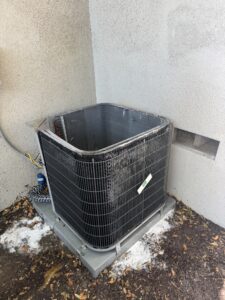
Your outdoor AC unit is exposed to the elements, which means it can accumulate dirt, leaves, and other debris. Over time, this buildup can become significant, obstructing airflow passing through the fins that expel heat from refrigerant and reducing the unit's efficiency. When airflow is restricted, the AC has to work harder to cool your home, leading to higher energy bills and potential mechanical issues that could require expensive repairs. Regular cleaning helps to maintain optimal performance and extend the lifespan of your unit. Moreover, a clean unit reduces the risk of overheating and ensures that the air circulating in your home is as clean and fresh as possible.
Not only does a clean unit operate more efficiently, but it also minimizes wear and tear on the system. The less strain on your unit, the longer it will last. This proactive approach to maintenance can prevent unexpected breakdowns, which are not only inconvenient but can also leave you miserable during the hottest days of the year. By investing a small amount of time in regular cleaning, you can avoid the discomfort and cost of an underperforming or non-functioning AC unit.
Before you begin, gather the following tools and materials to ensure a smooth cleaning process:
- Garden hose with a spray nozzle: This will help you rinse away dirt and debris without causing damage to the delicate fins.
- Soft brush or vacuum with a brush attachment: These tools are essential for gently removing dust and dirt from the fins.
- Screwdriver or wrench (depending on your unit): These tools will help you access the interior components of your unit.
- Fin comb (optional): Useful for straightening any bent fins, which can hinder airflow and reduce efficiency.
- Safety gloves and goggles: Essential for protecting your hands and eyes from debris and sharp edges.
- Simple green: This helps remove stubborn accumulation
Having these tools ready before you start will streamline the cleaning process and ensure you can address any issues you encounter. It's always better to be prepared, as this allows you to work efficiently and effectively without unnecessary interruptions.
Safety First
Before starting the cleaning process, ensure your safety by following these precautions:
- Turn off the Power: Locate the electrical disconnect box near the unit and turn off the power. This step is crucial as it prevents the unit from starting up while you're cleaning it, which could lead to injury or damage to the unit.
- Wear Protective Gear: Safety goggles and gloves will protect you from debris and sharp edges. The fins of the AC unit can be sharp, and debris can fly unexpectedly, so it's essential to protect yourself.
- Check the Weather: Choose a dry day to clean your unit to prevent water from causing any electrical issues. Moisture and electricity don't mix, so ensuring a dry environment is critical for safety.
Taking these precautions ensures that you can clean your unit without risking injury or causing damage to the AC system. Safety should always be your top priority when working with electrical appliances.
Step-by-Step Cleaning Process
Step 1: Remove Debris
Begin by removing any large debris, such as leaves, twigs, or grass clippings, from around the unit. This will prevent them from getting inside the unit and causing blockages. Clearing the area around your AC unit is an essential first step, as it ensures that nothing obstructs your access to the unit during the cleaning process.
After removing the larger debris, take a moment to clear the surrounding area of any potential obstructions. Consider trimming back any nearby bushes or shrubs, as overgrown vegetation can also impede airflow. Maintaining a clear space around your unit will help it run more efficiently and make future maintenance easier.
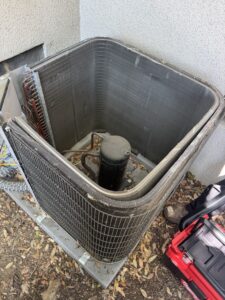
Step 2: Clean the Fins
- Access the Fins: Use a screwdriver or wrench to remove the screws or bolts holding the unit's cover in place. Carefully lift the cover to access the fins. This will allow you to see the condition of the fins and identify any areas that need special attention.
- Brush the Fins: Use a soft brush or vacuum with a brush attachment to gently remove dirt and dust from the fins. Be careful not to bend them, as this can restrict airflow. The fins are delicate, and bending them can significantly reduce the unit's efficiency.
- Straighten Bent Fins: If any fins are bent, use a fin comb to straighten them. This helps improve airflow and efficiency. Straight fins allow air to pass through more easily, ensuring optimal performance.
Taking care to clean and straighten the fins effectively will help your unit run smoothly and reduce the risk of overheating. This step is crucial for maintaining the efficiency of your AC system.
Step 3: Wash the Fins
- Spray with unit with a Hose: Spray a generous amount of simple green around the units' fins. Then use a garden hose with a spray nozzle to rinse the fins from the inside out. Avoid using a pressure washer, as it can damage the fins. The gentle spray of a hose is sufficient to remove dirt without causing harm.
- Avoid the Fan Motor: Be careful not to spray water directly into the fan motor. Instead, direct the water at an angle to ensure thorough cleaning without causing damage. The fan motor is a vital component of the unit and protecting it during cleaning is essential for the longevity of your AC system.
Properly washing the fins will help remove any remaining dirt and debris, allowing for optimal airflow and cooling efficiency. This step ensures that your unit is clean without risking damage to its components.
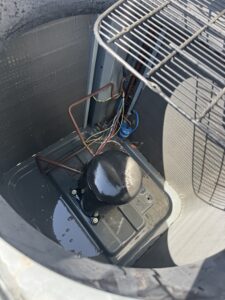
Step 4: Clean the Coils
- Inspect the Coils: Check the coils for dirt buildup. If they're particularly dirty, consider using a commercial coil cleaner for a deeper clean. The coils play a crucial role in the cooling process, and keeping them clean is vital for efficiency.
- Rinse the Coils: Use the garden hose to rinse the coils, taking care to avoid damaging them with high-pressure water. A gentle rinse is usually sufficient to remove most dirt and debris.
Cleaning the coils is essential for maintaining the cooling efficiency of your unit. Clean coils enable the unit to transfer heat more effectively, reducing strain on the system and enhancing performance.
Step 5: Reassemble the Unit
- Replace the Cover: Once the fins and coils are clean, carefully place the cover back on the unit and secure it with screws or bolts. Ensure everything is aligned correctly to avoid any operational issues.
- Check for Debris: Before turning the power back on, ensure there are no leaves or debris inside the unit. A final check helps prevent any potential blockages when the unit is operational.
Reassembling the unit correctly ensures it will function properly once turned back on. Taking a moment to double-check your work can prevent future problems and keep your AC running smoothly.
Routine Maintenance Tips
To keep your outdoor AC unit in peak condition, incorporate these maintenance tips into your routine:
- Trim Vegetation: Keep plants and shrubs at least two feet away from the unit to ensure adequate airflow. Overgrown vegetation can obstruct airflow and reduce efficiency.
- Inspect Monthly: Check the unit for debris and damage monthly, especially during the cooling season. Regular inspections help catch potential issues before they become significant problems.
- Schedule Professional Maintenance: Have a professional technician inspect and service your unit annually to catch any potential issues early. Professional maintenance can extend the life of your unit and ensure it operates at peak efficiency.
Following these maintenance tips will help ensure your AC unit remains in excellent condition, providing reliable cooling throughout the season. Regular upkeep is key to maximizing the lifespan and performance of your system.
Frequently Asked Questions
Can I clean the AC unit while it's running?
It's essential to turn off the power to the AC unit before cleaning it. This ensures your safety and prevents any electrical issues. Cleaning while the unit is running can be dangerous and may lead to unintended damage.
Working on an active unit can also lead to inaccurate cleaning, as the movement of parts can obstruct your efforts and increase the risk of injury. Always ensure the unit is powered down before beginning any maintenance work.
How often should I clean my outdoor AC unit?
Clean your outdoor AC unit at least once a year, preferably before the cooling season begins. However, if you live in an area with heavy pollen or dust, consider cleaning it more frequently. Regular cleaning ensures optimal efficiency and reduces the risk of unexpected breakdowns.
Frequent cleaning is especially important in areas with environmental factors that contribute to dirt and debris buildup. Assess your local conditions to determine the best cleaning schedule for your unit.
What if I notice damage to my AC unit?
If you discover damage, such as bent fins or leaking refrigerant, contact a professional technician for repairs. Attempting to fix these issues yourself may lead to further damage. A professional can accurately diagnose and repair problems, ensuring the longevity and efficiency of your unit.
Ignoring damage or attempting DIY repairs can exacerbate issues and potentially void any warranties. Trusting a professional ensures that repairs are done correctly and safely.
Conclusion
Cleaning your outdoor AC unit is a straightforward task that can significantly improve its performance and longevity. By following this guide, you'll ensure that your unit operates efficiently, keeping your home comfortable and your energy bills in check. Regular maintenance is key to avoiding costly repairs and extending the life of your air conditioning system. A well-maintained unit is not only more efficient but also more reliable, providing peace of mind during the hottest months of the year.
Investing time in regular cleaning and maintenance pays off in the long run by ensuring your AC unit runs smoothly and efficiently. Remember, a little effort today can save you a lot of trouble and expense tomorrow.